Types of Leading Lines in Photography Composition External InboxSearch for all messages with label Inbox

When it comes to photography composition, one of the most powerful tools at your disposal is leading lines. Like the invisible hand that guides a viewer’s eye through an image, leading lines are a subtle, yet highly effective, compositional element that can dramatically improve the visual impact of your photos.

What Are Leading Lines?

Leading lines are, in essence, visual paths drawn in an image that lead the viewer’s eye towards a particular point, often to the main subject of the photograph. They serve to guide the viewer’s attention, create depth, and add a dynamic element to a composition. Leading lines are everywhere, from the natural lines created by rivers or coastlines, to architectural lines in cityscapes, to implied lines in portraits.

Understanding and leveraging leading lines in photography can significantly enhance your images, and here are some types of leading lines you should know.
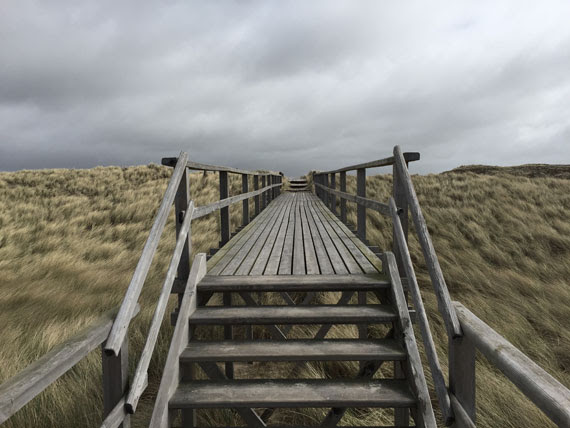
1. Straight Lines

Straight lines are probably the most common leading lines that photographers utilize. They are powerful and direct. Whether vertical, horizontal, or diagonal, they create a sense of order and stability.

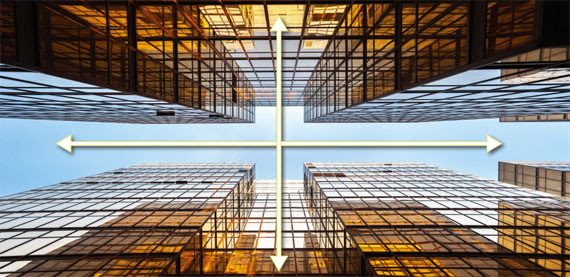
  • Vertical Lines: These lines can imply strength and grandeur. Think of towering skyscrapers or a towering tree in a forest.
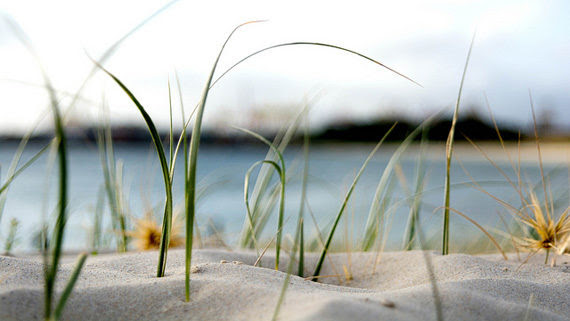
  • Horizontal Lines: These suggest tranquility and breadth. The horizon line in a landscape photo is a classic example.
  • Diagonal Lines: Diagonal lines add a sense of dynamism and movement to a composition. They are often used to lead the viewer’s eye from one corner of the image to another or directly to the subject.

2. Curved Lines

Curved lines, such as those found in winding roads, rivers, or architectural arches, create a sense of fluidity and grace in a composition. They can add a rhythmic, harmonious feel to your photographs and guide the viewer’s eye more subtly than straight lines. An “S” curve is a particularly pleasing type of curved line, often used in landscape and nature photography.
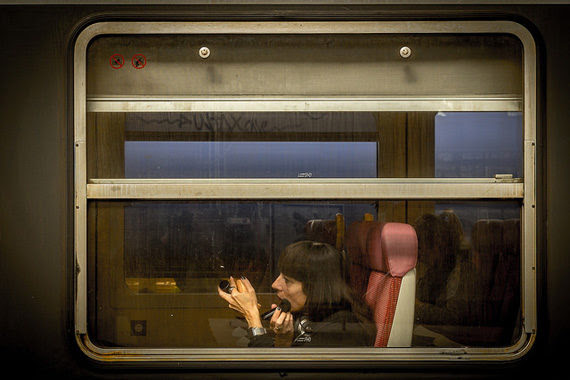
3. Implied Lines

These are lines that don’t physically exist but are suggested by elements within an image. They can be formed by the direction a person is looking, the path of a dancer’s leap, or even the sequential positioning of objects in a scene. Although they’re less obvious, they can be incredibly effective in guiding a viewer’s gaze towards the subject.

4. Interrupted Lines

An interrupted line is a leading line broken by another element or object in the frame. For example, a fence line may be interrupted by a gate or a tree. This type of line can create tension in an image and adds interest to the composition by breaking up the monotony of a continuous line.
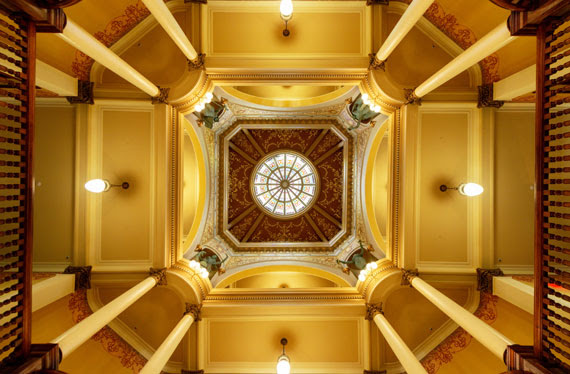
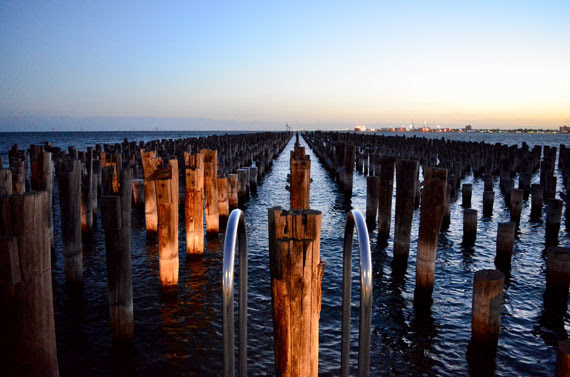
5. Converging Lines

Also known as perspective lines, converging lines are common in architectural and street photography. They occur when two or more lines start from different points but meet at a single point in the image, often on the horizon. Converging lines create depth and perspective, giving a three-dimensional feel to a two-dimensional image.

Conclusion

Mastering the use of leading lines can elevate your photography to new heights. They serve not only to draw attention to your main subject but also to instill a sense of order, add depth, and enhance the overall aesthetic of your images. As you become more familiar with these various types of leading lines, you’ll begin to see them everywhere and instinctively incorporate them into your compositions.

Remember, while these guidelines can be incredibly helpful, they’re not hard and fast rules. Experiment, be creative, and don’t be afraid to break the rules once you’ve learned them. After all, photography is an art form, and you are the artist. Harness the power of leading lines and let your unique vision shine through your work.


How photography enthusiasts in Delhi are honing their camera skills, one fortnightly walk at a time

Exciting news! Thrilled to be featured in The Indian Express Newspaper.

Read the full article here: https://indianexpress.com/…/how-photography…/.

Differences Between Lightroom Mobile, CC, and Classic

Lightroom has established itself as a commonly used tool in the digital photography landscape, offering solutions for image organization, raw photo processing, and non-destructive photo editing. The software suite is available in three versions, each tailored to meet different user needs: Lightroom Mobile, Lightroom CC, and Lightroom Classic. While these three share core functionalities, they are differentiated by their unique features and intended use cases.

This post aims to provide a clear understanding of these differences to help you make an informed decision about which version best suits your needs.

Lightroom Mobile

Lightroom Mobile is a free, standalone app available for Android and iOS devices. It has been designed with mobility in mind, bringing powerful Lightroom features to photographers on the go. Lightroom Mobile offers an intuitive, touch-friendly interface ideal for quick edits, and it supports RAW file import and editing.

While the basic version of Lightroom Mobile is free, to unlock its full capabilities you need a subscription to Adobe’s Creative Cloud Photography plan. The full version allows for seamless syncing with Lightroom CC and Lightroom Classic, so any edits made on your phone or tablet will automatically appear on your desktop, and vice versa. This is a great feature for photographers who want to edit photos while out in the field, then refine their edits on a desktop later.

Lightroom CC

Lightroom CC (Cloud Centric), as the name suggests, is a cloud-based service that allows for access to your photos from any device, anywhere. It’s available for Windows, Mac, iOS, Android, and even as a web application.

This version provides a more streamlined, user-friendly interface compared to Lightroom Classic. It’s designed to work well with touch interfaces and is less intimidating to new users. However, this simplicity comes with fewer advanced editing tools compared to Lightroom Classic.

One of the main features of Lightroom CC is its full-resolution cloud storage. With an Adobe Creative Cloud subscription, you get 1TB of cloud storage, making it easy to access and work on your photos from anywhere. However, if you have a large photo library, you may need to purchase additional storage.

Lightroom Classic

Lightroom Classic is the original, desktop-oriented version of Lightroom and is often favored by professional photographers due to its extensive feature set. It’s available for Windows and Mac systems.

Unlike Lightroom CC, which stores images in the cloud, Lightroom Classic is primarily designed to store and work with photos on your local storage. This might be preferable for photographers who don’t have consistent, high-speed internet access, or who want to maintain full control over where their files are stored.

Lightroom Classic provides more advanced, fine-grained photo editing tools, and it supports more complex workflows, such as split toning, color grading, and precise luminance control. It also has advanced features like smart collections, blending options, masking, and plugin support, which are not available in the other two versions.

The Right Tool for You

In essence, Lightroom Mobile is a versatile, mobile-friendly tool ideal for photographers on the go, Lightroom CC offers a simplified, cloud-centric experience suitable for beginners and users who value accessibility, and Lightroom Classic provides a comprehensive, desktop-centric toolset that appeals to professional photographers and power users.

Choosing the right version depends on your needs as a photographer. You might prefer Lightroom Mobile for its convenience and simplicity, Lightroom CC for its cross-device accessibility, or Lightroom Classic for its robust editing tools and desktop-oriented workflow. Alternatively, you might find that using a combination of the three serves you best. Whichever you choose, Adobe Lightroom offers powerful tools to help you get the most out of your photography.

10 Common Composition Mistakes in Photography

Are you making any of these common composition mistakes?

1. Subject Is in the Center of the Frame

Sometimes a central subject works, but normally it’s better to shoot it positioned to one side, as explained in the rule of thirds. Most cameras are capable of showing a grid in the viewfinder that can help us split the scene into thirds—horizontally and vertically. The main subject should ideally be positioned where the lines cross each other or in a full third, with the rest of the elements aligned with the grid lines.

Again, we have to mention that the rules of composition are a great aid to consider as a starting point, trying to move from centrally composed images, but keep in mind that sometimes it’s worth trying to break the rules to innovate—to create something more interesting. Let your feelings speak for you.

2. Subject Is Too Small in the Frame

Although our brains are great at focusing on a subject and excluding its surroundings, that almost never happens when you look at an image. When taking a shot, always consider if it would look better if you got closer (or zoomed in with your lens) so the subject fills the frame and clearly dominates the attention.

The more you include in a photograph, the more complex and difficult it is for the viewers to understand and appreciate the idea that is trying to be conveyed.

3. Nothing in the Foreground

It’s always a good idea to have something in the foreground to give the shot depth, draw the viewer’s eye in, and add scale, especially in a landscape or in a still life image. Don’t waste this space telling nothing to the viewer.

Logs, rocks, flowers, tide marks in the sand, or waves, for example, always add a little interest to the foreground. If you’re arranging a still life scene, you should try to put something in the front of the scene.

4. Always Shooting From a Standing Position or Straight On

You must play with perspective! Get down on your knees, move to one side, lay down, or get yourself to a higher point of view. Many of us get so worried about finding a subject that we forget to think about how we’re going to photograph it. If you shoot a subject straight on, you’ll record its appearance, but you may fail to capture any context or atmosphere. Again, experimenting is key!

5. Distracting Background

Always examine your photo’s background. We won’t miss clutter behind the subject, and it’s an easy fix if we move to one side, pick a different angle, change our lens, or use a wider aperture (to blur the background).

Get used to the habit of taking a good look around the scene before framing a shot to find the best background and shooting location.

6. Poor Use of Depth of Field

Depth of field is an important and powerful tool for composition; it determines which elements are in focus (clearly visible) in the image.

Shooting with a small aperture creates lots of depth of field, which is often desirable in landscapes and macros. But if you want your subject to standout from its surroundings, it is usually better to shoot with a bigger aperture (smaller f-number) to restrict depth of field. This is especially true for portraits.

7. Sloping Horizons

A sloping horizon in a landscape or even a portrait can be incredibly distracting, so make sure it’s level.

Many cameras have a built-in electronic level that can be displayed in the viewfinder or on the main screen to guide you, but if not, there are some bubble level accessories you can fit into the camera hot-shoe (normally used for an external flash unit).

Also, many tripods have a level built in if you’re looking into buying one.

8. Blurred Images

Sometimes we’re so worried about getting everything in focus that we set the aperture much too small, which calls in a need for a really slow shutter speed as a consequence.

Remember that aperture and shutter speed are closely linked; they work together to keep a good exposure in balance. The more you close down the aperture (smaller opening, larger f-number) the slower the shutter speed required to keep the exposure balanced. If the shutter speed is too slow, you can either open up your aperture or increase the ISO (or both) until you reach the correct exposure.

9. No Focal Point

The main subject in a photograph should be effectively positioned so that it’s the central point of interest in the composition (i.e. emphasized). We must draw the viewer’s eye exactly to where we want it. Size, color, shape, and contrast with the rest of the elements in the image are ways to isolate and direct attention to the subject.

10. Not Knowing Your Camera Controls and Functions

You MUST read your camera manual. Knowing your camera and all of its buttons and settings is vital. Being able to do that takes practice. You should be able to adjust ISO, shooting mode, focus point, exposure compensation, aperture, and shutter speed without taking the camera away from your eye. Believe us, it will make a difference that you can’t afford to miss!

Perfect Balance: Exploring Symmetry in Photographic Composition

Photography, as an art, requires an eye for detail and an understanding of the numerous principles that guide this form of visual expression. Among these principles is the concept of symmetry, a powerful tool that can transform your images into captivating masterpieces.

Understanding Symmetry

Symmetry refers to a sense of harmonious and beautiful proportion and balance. In photography, this means creating an image that can be divided into two parts that are mirror images of each other, either horizontally, vertically, or diagonally. The symmetry can be perfect, with each side being a precise mirror image, or it can be approximate, where the two halves are similar but not identical.

Photo captured by jet dela cruz

Symmetry is not just about mirroring; it’s about creating balance, harmony, and a sense of order in an image. It can add depth, highlight specific parts of the composition, or create a compelling visual rhythm.

Types of Symmetry in Photography

There are several types of symmetry that photographers can use to enhance their images:

Vertical Symmetry: This is the most common type of symmetry in photography. Vertical symmetry involves splitting an image down the middle vertically, so that each side mirrors the other. Buildings, trees, and human beings are all examples of subjects that often exhibit vertical symmetry.

Horizontal Symmetry: Horizontal symmetry involves dividing an image into two equal halves along a horizontal axis. Reflections in bodies of water, landscapes with horizons, and sunsets are examples of scenes that can exhibit horizontal symmetry.

Radial Symmetry: This is where the elements of an image radiate from a central point, creating a circular symmetry. Examples of this can be found in nature, such as flowers or a spiral seashell, or man-made objects like a wheel or a clock.

Reflective Symmetry: Reflective symmetry is seen when one half of the image reflects the other half. This type of symmetry can be vertical or horizontal, and is often found in architectural photography or in nature with bodies of water reflecting the landscape.

Rotational Symmetry: In rotational symmetry, the image looks the same even after being rotated by a certain degree. This type of symmetry is often found in patterned subjects, such as kaleidoscope images or snowflakes.

Tips for Using Symmetry in Photography Composition

Seek Symmetry in Everyday Life: One of the keys to using symmetry in your photography is to start seeing it in your everyday life. Look for patterns, reflections, and structures that offer symmetrical elements.

Use Symmetry to Guide the Viewer’s Eye: Symmetry can be a powerful tool for guiding the viewer’s eye towards the center of an image or to a particular focal point.

Experiment with Balance: Not all images have to be perfectly symmetrical. Playing with asymmetry can lead to unique and engaging compositions.

Break the Symmetry: Perfect symmetry can sometimes lead to monotonous compositions. Breaking the symmetry by introducing an unexpected element can often result in a more dynamic and engaging photo.

Use Your Camera’s Grid: Most cameras have an inbuilt grid that can help you align the elements of your image and create a symmetrical composition. Use this tool to your advantage.

Photo captured by Pete Alexopoulos

Symmetry in photography, when used effectively, can create compelling and visually pleasing compositions. It provides a sense of balance, stability, and harmony, which draws viewers into the photo. However, remember that the rules of composition, including symmetry, are not set in stone. They should serve as a guideline rather than a strict rule, allowing you to experiment and develop your unique photographic style.

In conclusion, understanding and mastering the art of symmetry can elevate your photography to new levels. So, keep your eyes open for symmetrical opportunities and let your creativity flow.