When it comes to landscape photography, choosing the right focal length is crucial for capturing breathtaking and expansive scenes. The most popular focal lengths for landscape photography typically fall within the wide-angle range, as they allow photographers to include as much of the scene as possible within the frame. Here’s a look at why certain focal lengths are favored and how they impact landscape photography.
The 24mm focal length has become the gold standard in landscape photography for several reasons, contributing to its popularity among enthusiasts and professionals alike. This preference stems from its ability to provide a wide field of view, capturing vast landscapes in a single frame without the extreme distortion often found with wider lenses. It offers a natural perspective that closely mirrors the human eye, making scenes appear expansive yet true to life.
Photographers favor 24mm because it excellently balances foreground interest with the depth of the background, creating dynamic and engaging compositions. Its versatility in various settings, from mountain ranges to urban landscapes, further cements its status as a preferred choice. The 24mm lens, by offering this unique blend of wide-angle perspective and minimal distortion, has become an indispensable tool for capturing the beauty and grandeur of the natural world, making it a clear favorite in the landscape photography community.
Wide-Angle Lenses (24mm to 35mm)
Within the wide-angle category, lenses ranging from 24mm to 35mm are particularly beloved for their versatility. These focal lengths capture a broad field of view, making them ideal for including sweeping vistas and dramatic skies in the composition. A 24mm lens is especially favored for its balance, as highlighted above, but even moving towards 35mm can offer a slightly tighter composition while still retaining a wide perspective.
Ultra-Wide Lenses (14mm to 24mm)
For photographers aiming to capture an even wider perspective, ultra-wide lenses ranging from 14mm to 24mm are the go-to choice. These lenses excel at emphasizing foreground elements and creating a profound sense of depth and scale. However, they may introduce noticeable distortion, which can either be used creatively or need to be corrected in post-processing.
Standard to Short Telephoto Lenses (50mm to 100mm)
Beyond the realm of wide and ultra-wide lenses, standard to short telephoto lenses (50mm to 100mm) offer a unique perspective in landscape photography. A 50mm lens provides a view close to that of the human eye, offering compositions with minimal distortion and a natural feel. Lenses in the 70mm to 100mm range are excellent for isolating subjects, compressing scenes, and highlighting specific features of the landscape, offering a different approach to capturing nature’s beauty.
Summary:
The choice of focal length for landscape photography depends greatly on the photographer’s vision, the landscape being captured, and the desired outcome. While wide and ultra-wide lenses are popular for their capacity to envelop expansive scenes, longer focal lengths provide unique perspectives and compositional opportunities. The 24mm lens, in particular, stands out for its unparalleled ability to balance the vastness of landscapes with realistic perspectives, making it a favorite among landscape photographers. Experimentation with different focal lengths can unlock new and exciting ways to depict the natural world, continually enriching the art form of landscape photography.
http://www.delhiphotographyclub.com/wp-content/uploads/2024/02/unnamed-96.jpg380570#iamdpchttp://www.delhiphotographyclub.com/wp-content/uploads/2020/03/Copy-of-Celebrate-Freedom-3.png#iamdpc2024-02-26 08:31:342024-03-07 11:44:50The Most Popular Focal Length for Landscape Photography
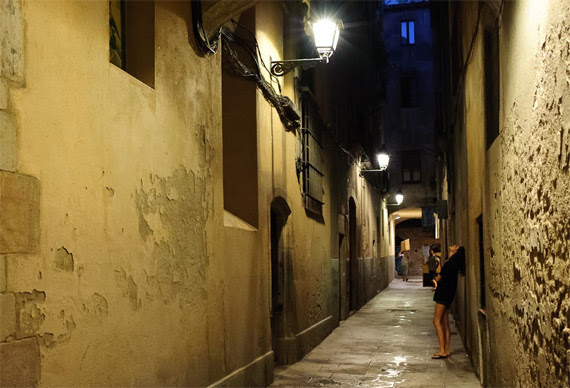
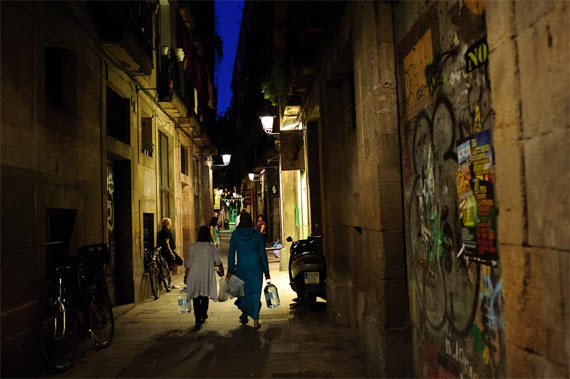
Taking pictures at night gives an image a completely different feel because it captures different stories of daily life—sometimes more dramatic than the ones captured during the day. There is also a whole new cast of characters at night that make taking pictures on the streets after dark an even more adventurous experience in street photography.
Just by decreasing the available light, we increase the element of mystery in the image. Don’t get me wrong, it could still be an average image. Just because it was taken at night the picture won’t magically become a great photograph, but it might become a little bit more interesting. It may make the viewer ask just a few more questions. And depending on where you are, it may even add an element of danger.
“You don’t have to go looking for pictures. The material is generous. You go out and the pictures are staring at you.” –Lee Friedlander
Here are a few tips for taking street photos at night:
1. Don’t use flash
I think this is key for several reasons. First, the ugly artificial light that results from the flash is just too harsh and unnatural. It also calls way too much attention to the photographer, and the idea in street photography is to blend in, not stand out like a lighthouse. Also, people expect the flash to go off after you take a picture at night; when they don’t see the bright light coming from the camera that was pointed at them, they think that you didn’t take a photo and they probably won’t question you. I never use flash when I shoot at night (or day or ever, for that matter). It might take some practice but in a short time you won’t miss it.
2. Increase the ISO
More than a suggestion, this is a necessity. Unless you increase the ISO, the shutter speed might become too slow and the whole picture will be way too blurry to even see what’s going on. As I wrote before, a little bit of motion blur is fantastic and makes for great street photography shots. But if the photo’s too blurry it loses the effect and is just confusing.
High ISO will also give the image some “noise” and it will look grainy, which is a great look for street photography. Make grain and blur your friends, not your enemies.
“New images surround us everywhere. They are invisible only because of sterile routine convention and fear.” –Lisette Model
3. Use available light to your advantage
Find a bright corner or a storefront window and position yourself in a way that it will light your subject’s face. Or maybe you want the light to their backs to make them silhouettes. Either way is fine, the choice is yours. It’s all a matter of moving around the light. Find what works and wait for an interesting subject to walk by. Try pointing the camera into the inside of storefronts or brightly lit buses; the light may be just enough to capture great scenes of people unaware that you are capturing the scene.
4. Use fast lenses
Fast lenses, with maximum apertures such as f/2.8 or f/1.4 are great for low light situations. The same thing applies to full frame cameras. Any lens or camera is fine but full frame cameras or fast lenses make things easier because they have a better sensitivity to light. Use what you have and practice and look at the results before you invest your paycheck in a more expensive camera or lens.
“Anything that excites me for any reason, I will photograph; not searching for unusual subject matter, but making the commonplace unusual” –Edward Weston
5. Avoid isolated areas
It’s not necessary to go to a dangerous area to get interesting pictures. Any crowded area will do, especially if you are just starting.
Taking pictures on the streets at night is not the usual thing to do, but if you want to give your street photography a little extra excitement consider going out for a walk after the sunlight has been replaced by street lamps.
http://www.delhiphotographyclub.com/wp-content/uploads/2023/11/unnamed-66.jpg379570#iamdpchttp://www.delhiphotographyclub.com/wp-content/uploads/2020/03/Copy-of-Celebrate-Freedom-3.png#iamdpc2023-11-06 11:58:082023-11-08 08:54:43Street Photography Tips at Night- upgrade your photos.
That’s kind of the biggest slap in the face that you can give a photographer.
None of us want to believe that we’re snapshooters.
Truthfully, almost none of us are, because we all make decisions as we’re taking a picture—whether we realize it or not.
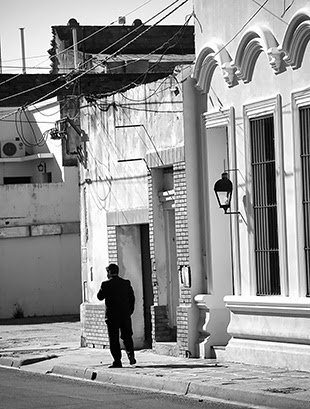
The picture above may appear to be a simple snapshot—a quick and meaningless moment captured.
However, it was quite the opposite. I conceived the photo and mentally prepared before the camera was even turned on.
There is a photographic term that encompasses this mental process of strategizing and executing an image: pre-visualization.
For a moment, imagine the term “pre-visualization” basically means “translation.”
With pre-visualization, you translate a three-dimensional scene, which you can see in real-life, onto a two-dimensional medium—a photograph. As you can imagine, a significant component of pre-visualization is composition.
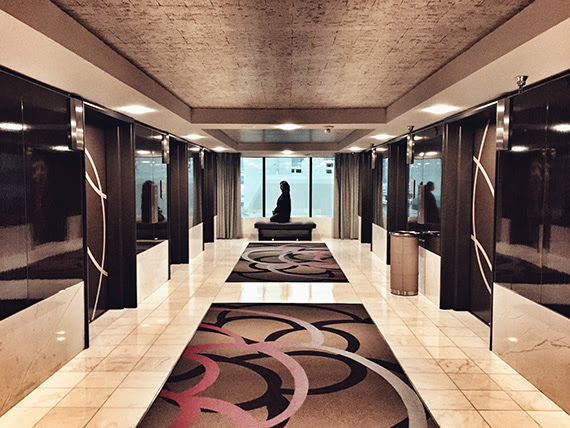
The photo above is a perfect example. It was taken in Las Vegas from a 12th-floor hotel room. It depicts a cityscape that is partially obscured by a window shade.
What you see here is what I saw in my mind before clicking the shutter. I didn’t see a window shade or a cityscape; what I saw in my mind was a semi-abstract painting depicted in a photograph.
Key Thought: When attempting pre-visualization, imagine your scene printed huge, framed and hanging on a large blank wall. What do you see?
Pre-visualization began in Hollywood with moviemaking and the art of storyboarding.
Photographer Ansel Adams is credited with bringing the idea to still photography.
Pre-visualization is the art of seeing the finished photograph in your mind before you ever pick up a camera.
It may sound easy, but it requires developed skills in art knowledge, equipment, composition, lighting, exposure and post-processing.
The first step toward pre-visualization is training your eye to see the world in terms of spatial relationships, rather than literal objects.
A spatial relationship, in art, is the ability to perceive the involvement of an object’s position within a given space.
In this example photo above, I saw the pre-visualized the shape of a man in a dark suit surrounded by the space of white buildings.
Idea: When I began taking photography seriously, a mentor of mine taught me this simple trick to help me develop my ability to see spatial relationships. Just cup your fingers and thumb to form a cylinder, then close one eye and hold the cylinder in front of the open eye
Viewing a scene that you wish to photograph through this “lens” removes your peripheral vision and gives you something closer to a two-dimensional perspective. In fact, if you watch documentaries on filmmaking, you will often see the filmmaker using this same technique.
It forces you to see your scene in terms of spatial relationships!
Critical Thought: Practicing spatial-relationship recognition is the first step in developing professional pre-visualization skills.
A spatial relationship is intrinsically tied to light, shadow, color, and shape.
Another fantastic training tool for developing pre-visualization, similar to the technique above, is to view your scene through squinted eyes and using your fingers to “crop” the scene in front of you.
This activity eliminates details and divides the scene into spatial blocks of light, shadow, color and shape.
Idea: As you begin learning pre-visualization and using your eyes and hands as training tools, it’s best to stick with static subjects like landscapes. Once you’ve improved your pre-visualization to the point of no longer needing these techniques, you’re ready to take on moving scenes.
Key Thought: Moving scenes add an additional level of skill to pre-visualization. This extra skill is called anticipation.
This example photo is a perfect scene to begin pre-visualization practice:
Look at this picture using the techniques described above. You will see how it breaks down into a spatial relationship of shape, color, line and tone.
Critical Thought: Understanding your equipment is key to pre-visualization. If you don’t know how your equipment will affect the photograph, how can you pre-visualize it?
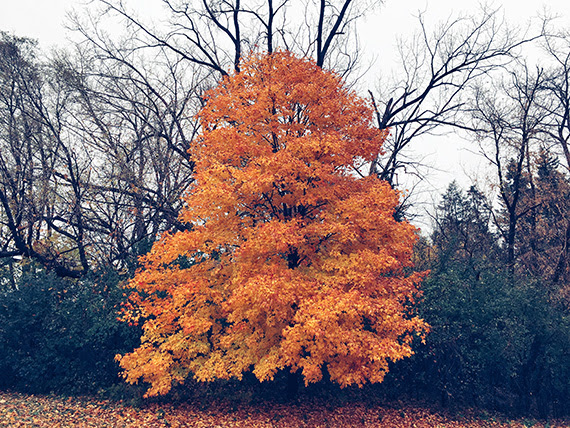
In my pre-visualization of the autumn tree photograph above, I saw an almost abstract image with blocks of color and a little to no perception of depth.
Knowing this, I selected a telephoto lens to compress the scene. That equipment further enhanced my preconceived idea for this photograph.
Critical Thought: Pre-visualization begins in the mind, advances to the camera and ends in post-production.
To take the photograph above, I physically saw an orange lawn chair that was sitting in a driveway in the late afternoon light. It was casting a shadow onto the concrete.
In my mind, I pre-visualized the scene as an abstract watercolor painting.
I physically created the picture by framing it as I saw in my mind’s eye, focusing on the shadow more than the chair.
I asked a friend to stand by the chair to cast a shadow in the upper left third of the frame. I felt this would further add a sense of mystery.
However—this is the crucial point in this illustration—this pre-visualized photograph came together in post-production.
Most of what you see in the final photo is nothing close to what was captured in the original digital file. Still, it perfectly completes what I preconceived as a painting on the wall!
In the moments before this photograph was taken, I thought, “Oh my god! She better watch out for those waves!” This thought was the formulation of my pre-visualized picture. But more was needed!
Other core skills for pre-visualization are patience, anticipation and timing.
In the example photo, part of my pre-visualization was to capture the danger and drama of the heavy waves crashing onto the beach.
Without the woman, the pre-visualized shot fails.
This picture was born of a pre-visualized concept. However, it also required patience for the idea to materialize naturally. I needed someone or something to enter the frame and provide a sense of drama and potential danger.
It also required anticipation (having my equipment ready) once the shot began to materialize.
Many people were walking in this area. Several of them got close to where this woman was but then backed away.
When I noticed her, I could see she was going to make a point of venturing out further than anyone else.
I anticipated her action and had my equipment ready.
Finally, I timed the shot for the best spatial relationship. As you can imagine, there was a lot of movement here. The woman did not linger out there on those rocks. I had to anticipate and react when both she and the waves were at their peak spatial relationship.
Key Concept: Think of pre-visualization in this order:
Idea
Spatial relationships
Compose the frame in your mind
Imagine the image large and hanging on the wall
Introduce a story element
Have your equipment ready
Be patient for the story to develop
Anticipate the moment
Capture the shot at peak action
Use post-processing to bring your award-winning photograph to life!
Why Don’t You Give It a Try?
Organize a photoshoot where you will spend the better part of a day out taking pictures.
Do not take a picture before spending at least five minutes thinking about the picture and anticipating what it would look like hanging on your wall. Set a timer.
Post-process to your pre-visualized thoughts.
Print a selection of your best efforts. Tape them to a blank wall in your home. Leave them there for a week.
Each day, position yourself five feet in front of each photo and look at it for at least a minute, if not longer.
What Do You Think?
Do your finished photographs reflect your initial pre-visualized intent?
Were you able to follow through on your pre-visualization from beginning to end?
Do you now have a basic understanding of how pre-visualization can advance your photography?
http://www.delhiphotographyclub.com/wp-content/uploads/2023/08/unnamed-54.jpg361570#iamdpchttp://www.delhiphotographyclub.com/wp-content/uploads/2020/03/Copy-of-Celebrate-Freedom-3.png#iamdpc2023-08-11 08:32:212023-08-16 08:58:46Previsualization: Transforming Your Thoughts into Photos
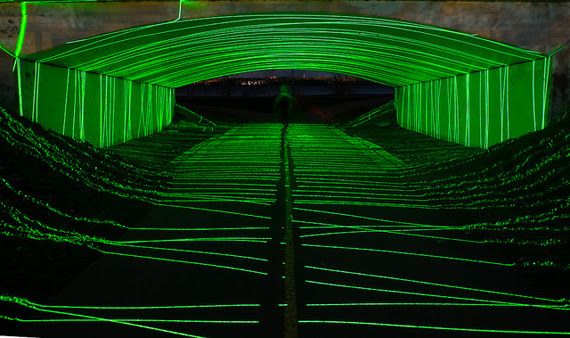
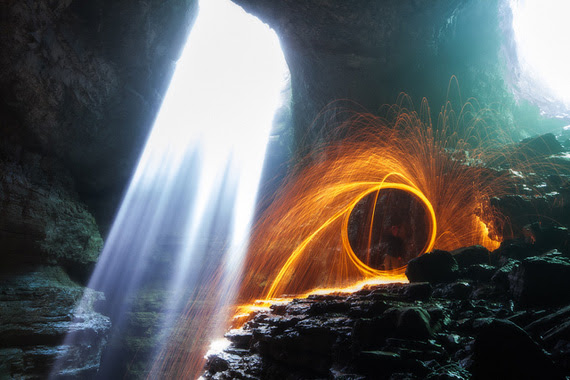
Light painting is a fun photography technique where photographers use camera flashes, flashlights, and spotlights to paint light in a scene. It can easily qualify as the best/most fun night photography technique. Although many photographers have attempted it before, only a few have mastered the technique. Below are some very useful tips to consider when you want to perfect your light painting skills.
1. Try out different light sources
This is very important You shouldn’t try painting everything using the same light. To avoid odd and flat pictures, consider using different light sources, otherwise your work will defy the sole purpose of light painting, which is to create unique light impressions on different landscape parts at night.
2. Use dimmable light sources
For the best results, you need to choose dimmable light sources, because light painting relies heavily on light intensity. To get the best results, you must be able to alter light intensity whichever way you like to ensure every part of a photo gets the right amount of light.
3. Take care of the noise
It is important to note that long exposures create more noise. Because of this, take time painting in light, but don’t forget to factor in this small detail; it can be the difference between good and bad lighting photography.
4. Take multiple shots
To get the best light painting photos, you need to take as many shots as possible. Multiple shots help you treat different parts of a photo separately which should be the case in light painting.
5. Use flashlights that don’t have hot spots
Moving your flashlight beam randomly when taking light photos doesn’t make a big difference even if your flashlight has a hot spot (a bright circle located at the center of the beam). The hotspot does, however, make a big difference when you are considering fine details in scenes. If you don’t have money to buy the perfect flashlight, consider taping tissue paper or wax paper over your flashlight lens to eliminate hot spots.
6. Include night photography techniques
Just because you are light painting shouldn’t mean you forget typical night photography techniques. You must consider techniques like mirror lockup, cable release, long exposure noise reduction, etc., to ensure you get the best outcome.
7. Mix ambient light
You should also remember to incorporate ambient light—like street lights or moon light—to add mood to your photos. Using flashlights shouldn’t mean you ignore all other light sources.
Keep these tips in mind next time you head out for a light painting shoot.
Of all the lines used in photography, diagonals are the most dynamic. You can use them to create a strong impression of movement or you can use them to create a tremendous sense of depth. All images are created with lines—some vertical, horizontal and others converging—but knowing how to place them affects the mood and composition of the final image.
A sense of order is created with vertical and horizontal lines, implying stability and strength. Diagonals are unbalanced and appear to be unstable. What they communicate is dynamic, yet precarious. They always appear to be falling over or not quite secure. This is what lends itself to a dramatic image.
The easiest way to create diagonals is simply by tilting your camera. Slanted views of horizontals and verticals and can easily be created by the photographer. I find that a bit of tilt to my camera adds a little slant to the image and creates a perfect diagonal line.
Try capturing a simple image like a car or skyscraper by tilting the camera forty five degrees and see the effect you create. What happens to the image? The car looks as if it is going fast while skyscraper appears to be reaching for the sky. This effect is created simply by simply turning your camera
When shooting from high up from a bird’s eye view, you can really create some stunning images. Look for lines then tilt the camera. The bird’s eye vantage allows you great leeway, as there is no right way, no up or down; everything is two dimensional. Experiment with patterns and color, and you will arrive at some dramatic compositions.
Don’t be afraid to use crazy angles and change your viewpoint when shooting with diagonals. They will help give you a sense of depth and perspective. They tend to lead the eye to whatever focal point you decide, to a place where they end or disappear into nothing. Diagonals encourage the eye of the viewer to follow, almost like the Judas goat at the abattoir that leads the livestock to the slaughter. A set of footprints, a curved hedge, or river can be used to guide the viewers to the point of focus. But you must lead them to something that has a strong interest otherwise the viewer is left feeling that the image is incomplete.
Then there is the zigzag effect when using diagonals in patterns. The repeated pattern can also be used to drag the eye into the image over a larger area of the frame. These patterns are dynamic and, when used with horizontals and verticals, become even more dramatic.
I have always chosen diagonals as my favorite lines because they are so dynamic and add something to my images. Bottom line though, as you learn digital photography, you need to experiment and practice what you learn in order to master it. Happy shooting!
About the Author: Wayne Turner has been teaching photography for 25 years and has written three books on photography. He has produced 21 Steps to Perfect Photos; a program of learner-based training using outcomes based education.
http://www.delhiphotographyclub.com/wp-content/uploads/2020/03/Copy-of-Celebrate-Freedom-3.png00#iamdpchttp://www.delhiphotographyclub.com/wp-content/uploads/2020/03/Copy-of-Celebrate-Freedom-3.png#iamdpc2023-07-26 09:09:222023-07-31 10:03:23Diagonal Leading Lines in Photography