When it comes to landscape photography, choosing the right focal length is crucial for capturing breathtaking and expansive scenes. The most popular focal lengths for landscape photography typically fall within the wide-angle range, as they allow photographers to include as much of the scene as possible within the frame. Here’s a look at why certain focal lengths are favored and how they impact landscape photography.
The 24mm focal length has become the gold standard in landscape photography for several reasons, contributing to its popularity among enthusiasts and professionals alike. This preference stems from its ability to provide a wide field of view, capturing vast landscapes in a single frame without the extreme distortion often found with wider lenses. It offers a natural perspective that closely mirrors the human eye, making scenes appear expansive yet true to life.
Photographers favor 24mm because it excellently balances foreground interest with the depth of the background, creating dynamic and engaging compositions. Its versatility in various settings, from mountain ranges to urban landscapes, further cements its status as a preferred choice. The 24mm lens, by offering this unique blend of wide-angle perspective and minimal distortion, has become an indispensable tool for capturing the beauty and grandeur of the natural world, making it a clear favorite in the landscape photography community.
Wide-Angle Lenses (24mm to 35mm)
Within the wide-angle category, lenses ranging from 24mm to 35mm are particularly beloved for their versatility. These focal lengths capture a broad field of view, making them ideal for including sweeping vistas and dramatic skies in the composition. A 24mm lens is especially favored for its balance, as highlighted above, but even moving towards 35mm can offer a slightly tighter composition while still retaining a wide perspective.
Ultra-Wide Lenses (14mm to 24mm)
For photographers aiming to capture an even wider perspective, ultra-wide lenses ranging from 14mm to 24mm are the go-to choice. These lenses excel at emphasizing foreground elements and creating a profound sense of depth and scale. However, they may introduce noticeable distortion, which can either be used creatively or need to be corrected in post-processing.
Standard to Short Telephoto Lenses (50mm to 100mm)
Beyond the realm of wide and ultra-wide lenses, standard to short telephoto lenses (50mm to 100mm) offer a unique perspective in landscape photography. A 50mm lens provides a view close to that of the human eye, offering compositions with minimal distortion and a natural feel. Lenses in the 70mm to 100mm range are excellent for isolating subjects, compressing scenes, and highlighting specific features of the landscape, offering a different approach to capturing nature’s beauty.
Summary:
The choice of focal length for landscape photography depends greatly on the photographer’s vision, the landscape being captured, and the desired outcome. While wide and ultra-wide lenses are popular for their capacity to envelop expansive scenes, longer focal lengths provide unique perspectives and compositional opportunities. The 24mm lens, in particular, stands out for its unparalleled ability to balance the vastness of landscapes with realistic perspectives, making it a favorite among landscape photographers. Experimentation with different focal lengths can unlock new and exciting ways to depict the natural world, continually enriching the art form of landscape photography.
http://www.delhiphotographyclub.com/wp-content/uploads/2024/02/unnamed-96.jpg380570#iamdpchttp://www.delhiphotographyclub.com/wp-content/uploads/2020/03/Copy-of-Celebrate-Freedom-3.png#iamdpc2024-02-26 08:31:342024-03-07 11:44:50The Most Popular Focal Length for Landscape Photography
That’s kind of the biggest slap in the face that you can give a photographer.
None of us want to believe that we’re snapshooters.
Truthfully, almost none of us are, because we all make decisions as we’re taking a picture—whether we realize it or not.
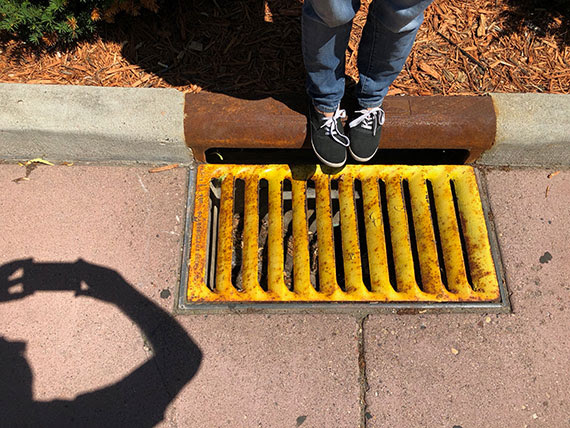
The picture above may appear to be a simple snapshot—a quick and meaningless moment captured.
However, it was quite the opposite. I conceived the photo and mentally prepared before the camera was even turned on.
There is a photographic term that encompasses this mental process of strategizing and executing an image: pre-visualization.
For a moment, imagine the term “pre-visualization” basically means “translation.”
With pre-visualization, you translate a three-dimensional scene, which you can see in real-life, onto a two-dimensional medium—a photograph. As you can imagine, a significant component of pre-visualization is composition.
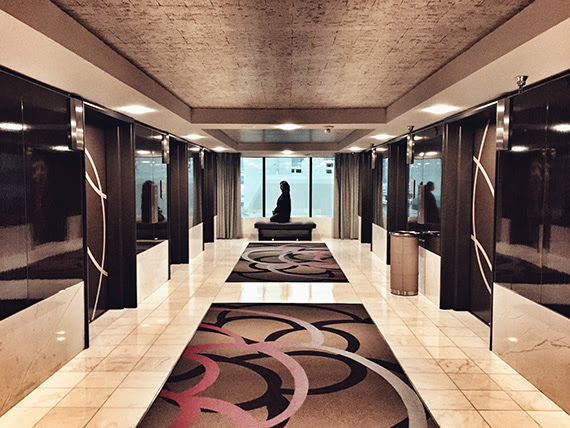
The photo above is a perfect example. It was taken in Las Vegas from a 12th-floor hotel room. It depicts a cityscape that is partially obscured by a window shade.
What you see here is what I saw in my mind before clicking the shutter. I didn’t see a window shade or a cityscape; what I saw in my mind was a semi-abstract painting depicted in a photograph.
Key Thought: When attempting pre-visualization, imagine your scene printed huge, framed and hanging on a large blank wall. What do you see?
Pre-visualization began in Hollywood with moviemaking and the art of storyboarding.
Photographer Ansel Adams is credited with bringing the idea to still photography.
Pre-visualization is the art of seeing the finished photograph in your mind before you ever pick up a camera.
It may sound easy, but it requires developed skills in art knowledge, equipment, composition, lighting, exposure and post-processing.
The first step toward pre-visualization is training your eye to see the world in terms of spatial relationships, rather than literal objects.
A spatial relationship, in art, is the ability to perceive the involvement of an object’s position within a given space.
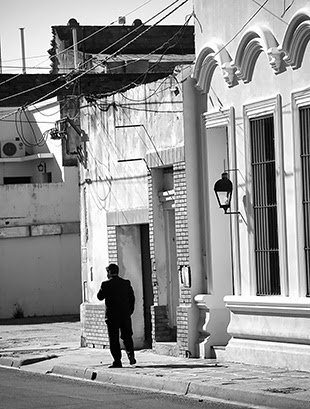
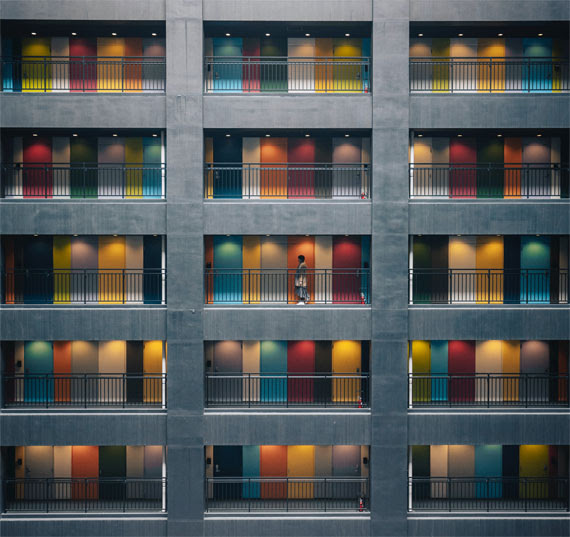
In this example photo above, I saw the pre-visualized the shape of a man in a dark suit surrounded by the space of white buildings.
Idea: When I began taking photography seriously, a mentor of mine taught me this simple trick to help me develop my ability to see spatial relationships. Just cup your fingers and thumb to form a cylinder, then close one eye and hold the cylinder in front of the open eye
Viewing a scene that you wish to photograph through this “lens” removes your peripheral vision and gives you something closer to a two-dimensional perspective. In fact, if you watch documentaries on filmmaking, you will often see the filmmaker using this same technique.
It forces you to see your scene in terms of spatial relationships!
Critical Thought: Practicing spatial-relationship recognition is the first step in developing professional pre-visualization skills.
A spatial relationship is intrinsically tied to light, shadow, color, and shape.
Another fantastic training tool for developing pre-visualization, similar to the technique above, is to view your scene through squinted eyes and using your fingers to “crop” the scene in front of you.
This activity eliminates details and divides the scene into spatial blocks of light, shadow, color and shape.
Idea: As you begin learning pre-visualization and using your eyes and hands as training tools, it’s best to stick with static subjects like landscapes. Once you’ve improved your pre-visualization to the point of no longer needing these techniques, you’re ready to take on moving scenes.
Key Thought: Moving scenes add an additional level of skill to pre-visualization. This extra skill is called anticipation.
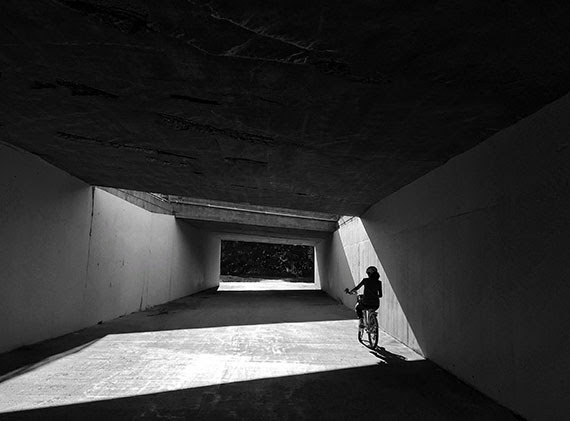
This example photo is a perfect scene to begin pre-visualization practice:
Look at this picture using the techniques described above. You will see how it breaks down into a spatial relationship of shape, color, line and tone.
Critical Thought: Understanding your equipment is key to pre-visualization. If you don’t know how your equipment will affect the photograph, how can you pre-visualize it?
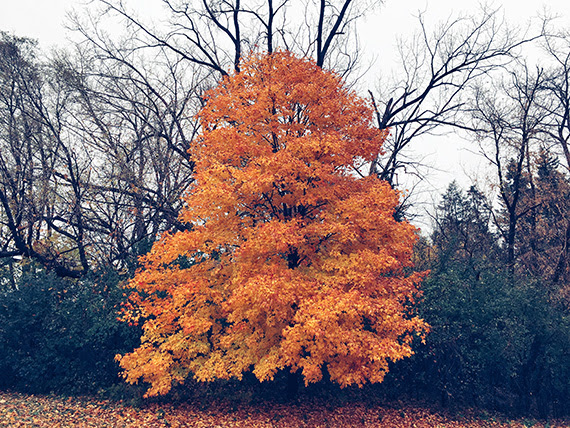
In my pre-visualization of the autumn tree photograph above, I saw an almost abstract image with blocks of color and a little to no perception of depth.
Knowing this, I selected a telephoto lens to compress the scene. That equipment further enhanced my preconceived idea for this photograph.
Critical Thought: Pre-visualization begins in the mind, advances to the camera and ends in post-production.
To take the photograph above, I physically saw an orange lawn chair that was sitting in a driveway in the late afternoon light. It was casting a shadow onto the concrete.
In my mind, I pre-visualized the scene as an abstract watercolor painting.
I physically created the picture by framing it as I saw in my mind’s eye, focusing on the shadow more than the chair.
I asked a friend to stand by the chair to cast a shadow in the upper left third of the frame. I felt this would further add a sense of mystery.
However—this is the crucial point in this illustration—this pre-visualized photograph came together in post-production.
Most of what you see in the final photo is nothing close to what was captured in the original digital file. Still, it perfectly completes what I preconceived as a painting on the wall!
In the moments before this photograph was taken, I thought, “Oh my god! She better watch out for those waves!” This thought was the formulation of my pre-visualized picture. But more was needed!
Other core skills for pre-visualization are patience, anticipation and timing.
In the example photo, part of my pre-visualization was to capture the danger and drama of the heavy waves crashing onto the beach.
Without the woman, the pre-visualized shot fails.
This picture was born of a pre-visualized concept. However, it also required patience for the idea to materialize naturally. I needed someone or something to enter the frame and provide a sense of drama and potential danger.
It also required anticipation (having my equipment ready) once the shot began to materialize.
Many people were walking in this area. Several of them got close to where this woman was but then backed away.
When I noticed her, I could see she was going to make a point of venturing out further than anyone else.
I anticipated her action and had my equipment ready.
Finally, I timed the shot for the best spatial relationship. As you can imagine, there was a lot of movement here. The woman did not linger out there on those rocks. I had to anticipate and react when both she and the waves were at their peak spatial relationship.
Key Concept: Think of pre-visualization in this order:
Idea
Spatial relationships
Compose the frame in your mind
Imagine the image large and hanging on the wall
Introduce a story element
Have your equipment ready
Be patient for the story to develop
Anticipate the moment
Capture the shot at peak action
Use post-processing to bring your award-winning photograph to life!
Why Don’t You Give It a Try?
Organize a photoshoot where you will spend the better part of a day out taking pictures.
Do not take a picture before spending at least five minutes thinking about the picture and anticipating what it would look like hanging on your wall. Set a timer.
Post-process to your pre-visualized thoughts.
Print a selection of your best efforts. Tape them to a blank wall in your home. Leave them there for a week.
Each day, position yourself five feet in front of each photo and look at it for at least a minute, if not longer.
What Do You Think?
Do your finished photographs reflect your initial pre-visualized intent?
Were you able to follow through on your pre-visualization from beginning to end?
Do you now have a basic understanding of how pre-visualization can advance your photography?
http://www.delhiphotographyclub.com/wp-content/uploads/2023/08/unnamed-54.jpg361570#iamdpchttp://www.delhiphotographyclub.com/wp-content/uploads/2020/03/Copy-of-Celebrate-Freedom-3.png#iamdpc2023-08-11 08:32:212023-08-16 08:58:46Previsualization: Transforming Your Thoughts into Photos
Photography, as an art, requires an eye for detail and an understanding of the numerous principles that guide this form of visual expression. Among these principles is the concept of symmetry, a powerful tool that can transform your images into captivating masterpieces.
Understanding Symmetry
Symmetry refers to a sense of harmonious and beautiful proportion and balance. In photography, this means creating an image that can be divided into two parts that are mirror images of each other, either horizontally, vertically, or diagonally. The symmetry can be perfect, with each side being a precise mirror image, or it can be approximate, where the two halves are similar but not identical.
Photo captured by jet dela cruz
Symmetry is not just about mirroring; it’s about creating balance, harmony, and a sense of order in an image. It can add depth, highlight specific parts of the composition, or create a compelling visual rhythm.
Types of Symmetry in Photography
There are several types of symmetry that photographers can use to enhance their images:
Vertical Symmetry: This is the most common type of symmetry in photography. Vertical symmetry involves splitting an image down the middle vertically, so that each side mirrors the other. Buildings, trees, and human beings are all examples of subjects that often exhibit vertical symmetry.
Horizontal Symmetry: Horizontal symmetry involves dividing an image into two equal halves along a horizontal axis. Reflections in bodies of water, landscapes with horizons, and sunsets are examples of scenes that can exhibit horizontal symmetry.
Radial Symmetry: This is where the elements of an image radiate from a central point, creating a circular symmetry. Examples of this can be found in nature, such as flowers or a spiral seashell, or man-made objects like a wheel or a clock.
Reflective Symmetry: Reflective symmetry is seen when one half of the image reflects the other half. This type of symmetry can be vertical or horizontal, and is often found in architectural photography or in nature with bodies of water reflecting the landscape.
Rotational Symmetry: In rotational symmetry, the image looks the same even after being rotated by a certain degree. This type of symmetry is often found in patterned subjects, such as kaleidoscope images or snowflakes.
Tips for Using Symmetry in Photography Composition
Seek Symmetry in Everyday Life: One of the keys to using symmetry in your photography is to start seeing it in your everyday life. Look for patterns, reflections, and structures that offer symmetrical elements.
Use Symmetry to Guide the Viewer’s Eye: Symmetry can be a powerful tool for guiding the viewer’s eye towards the center of an image or to a particular focal point.
Experiment with Balance: Not all images have to be perfectly symmetrical. Playing with asymmetry can lead to unique and engaging compositions.
Break the Symmetry: Perfect symmetry can sometimes lead to monotonous compositions. Breaking the symmetry by introducing an unexpected element can often result in a more dynamic and engaging photo.
Use Your Camera’s Grid: Most cameras have an inbuilt grid that can help you align the elements of your image and create a symmetrical composition. Use this tool to your advantage.
Photo captured by Pete Alexopoulos
Symmetry in photography, when used effectively, can create compelling and visually pleasing compositions. It provides a sense of balance, stability, and harmony, which draws viewers into the photo. However, remember that the rules of composition, including symmetry, are not set in stone. They should serve as a guideline rather than a strict rule, allowing you to experiment and develop your unique photographic style.
In conclusion, understanding and mastering the art of symmetry can elevate your photography to new levels. So, keep your eyes open for symmetrical opportunities and let your creativity flow.
http://www.delhiphotographyclub.com/wp-content/uploads/2020/03/Copy-of-Celebrate-Freedom-3.png00#iamdpchttp://www.delhiphotographyclub.com/wp-content/uploads/2020/03/Copy-of-Celebrate-Freedom-3.png#iamdpc2023-07-12 06:35:422023-07-31 09:16:12Perfect Balance: Exploring Symmetry in Photographic Composition