Posts

The Hierarchy of Compositional Elements in Photography

As photographers, we are storytellers, using the language of visual elements to translate the three-dimensional world onto a two-dimensional plane. Understanding the art of composition is crucial to capturing compelling images that narrate our unique perspective of the world. It’s like arranging the notes of a melody to create a harmonious song.

However, the concept of an “order” to follow when considering the elements of composition isn’t carved in stone. Each scene, each subject, and each moment brings unique aspects that might prompt us to prioritize one compositional element over another. But for the sake of learning and practicing, it’s helpful to establish a guideline or a hierarchy of these elements. Let’s break down the sequence of considerations you might follow when composing a shot.

1. Vision and Intent

Before delving into the technical aspects of composition, start with the question: “What is my intent with this photograph?” Your vision is the driving force behind your composition. Do you want to highlight a certain emotion, convey a story, or just capture the beauty of the scene? Understanding your purpose will guide your use of compositional elements.

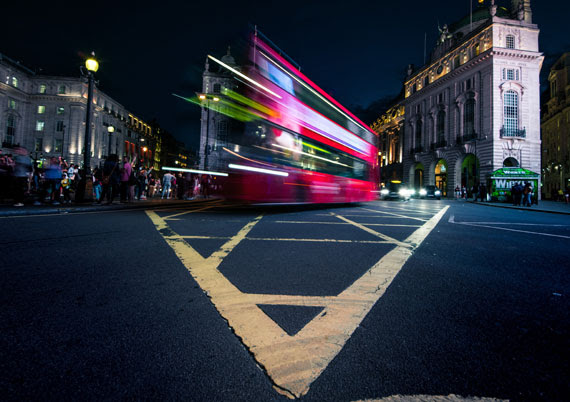
2. Framing and Placement of the Subject

Once you’re clear on your intent, consider the placement of your subject within the frame. The Rule of Thirds is a widely accepted principle to guide this step. The idea is to divide the frame into nine equal parts with two equally spaced horizontal and vertical lines, then place the key elements of your scene along these lines, or at their intersections.

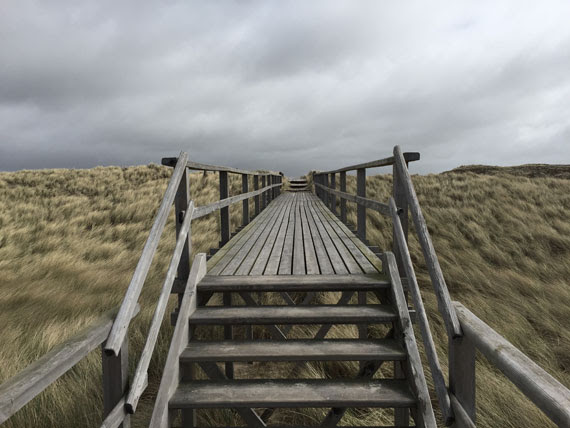
3. Use of Leading Lines

Leading lines are a powerful tool to guide the viewer’s eye towards the subject or a point of interest. These lines can be anything – a pathway, a stream, architectural elements, or even a gaze. The key is to identify these lines in your scene and align your shot to leverage them.

4. Depth and Perspective

Creating a sense of depth adds dimension and realism to your photographs. Play with elements like foreground, middle ground, and background. Use perspective and depth of field to create a three-dimensional effect in a two-dimensional medium.

5. Balance and Symmetry

Ensure that your image feels balanced, which can be achieved both symmetrically and asymmetrically. Symmetry provides a sense of harmony and proportion, while asymmetry, when balanced correctly, can make your image more dynamic and interesting.

6. Patterns and Textures

Patterns and textures can add a rich layer of depth to your photographs. They can either be the subject itself or complement the primary subject. Patterns provide a sense of rhythm, while textures can evoke tactile sensations making the image more immersive.

7. Lighting and Shadows

Lighting is not just an illuminator, but a storyteller. It can dramatically change the mood, texture, and tone of your photograph. The interplay of light and shadow is crucial for highlighting your subject, creating depth, and revealing textures.

8. Color and Contrast

Lastly, consider the color scheme and contrast. Colors can evoke emotional responses and set the mood. Contrast, on the other hand, can draw attention to your subject, guide the viewer’s eye, and add drama to your image.

Remember, while this hierarchy can be a helpful guide, it’s not a set of rigid rules. Composition is as much about intuition and personal style as it is about guidelines. The more you shoot, the more you develop an instinct for composing impactful images. So grab your camera, and let the world be your canvas!

Origin of the Rule of Thirds: Photography’s Golden Rule

Photography, with its perfect blend of art and science, offers myriad techniques that can be leveraged to capture stunning visuals. One of the most celebrated principles guiding photographers around the world is the ‘Rule of Thirds’. This rule, in its elegant simplicity, has helped produce some of the most powerful and balanced images in the history of the medium. To fully appreciate the impact of the Rule of Thirds, it’s beneficial to trace its roots back to its inception.

The Birth of the Rule

Despite its deep ties with photography, the rule of thirds was not initially a photographic concept. The origins of this rule trace back to John Thomas Smith’s 1797 book “Remarks on Rural Scenery” where Smith coined the term, discussing the balance of light and dark in a painting. This concept was deeply inspired by the theories of the golden ratio, dating back to the ancient Greeks.

The golden ratio or ‘divine proportion’ was widely used in Greek architecture and later by Renaissance artists. This ratio occurs when a line is divided into two parts such that the longer part divided by the smaller part is equal to the whole length divided by the longer part. It creates a visually pleasing balance that is thought to mirror patterns found in nature.

The Intersection with Photography

The evolution of the rule of thirds into photography is a fascinating tale of art adapting to technology. With the advent of cameras in the early 19th century, painters’ techniques were applied to the new medium to establish compositional norms.

In the 1860s, photographic societies began to formulate principles to guide the emerging field. During these discussions, the rule of thirds started gaining recognition among photographers.

The rule suggested that an image should be imagined as divided into nine equal parts by two equally spaced horizontal lines and two equally spaced vertical lines. Important compositional elements should be placed along these lines or their intersections. This technique gave images more tension, energy, and interest than simply centering the subject would.

Influence and Contemporary Use

In modern times, the rule of thirds has become a foundational principle of not only photography but also of visual arts such as design, painting, and even film-making. It’s extensively used in landscape photography, portraiture, and virtually any scenario where an engaging composition is required.

In landscape photography, the horizon line is often placed along one of the horizontal lines to emphasize either the sky or the land. In portraiture, the subject’s eyes are often placed on one of the intersection points to draw the viewer’s attention.

The rule of thirds has also found application in the digital space, guiding website and graphic design. Furthermore, many cameras and smartphones now offer a grid overlay function, making it easy for everyone, professionals and beginners alike, to experiment with this rule.

In Conclusion:

It’s fascinating how the rule of thirds, a principle that started its journey centuries ago in the field of painting, has remained relevant across multiple shifts in artistic mediums. It’s a testament to the enduring nature of the principle and its ability to create aesthetically pleasing and balanced compositions.

Types of Leading Lines in Photography Composition External InboxSearch for all messages with label Inbox

When it comes to photography composition, one of the most powerful tools at your disposal is leading lines. Like the invisible hand that guides a viewer’s eye through an image, leading lines are a subtle, yet highly effective, compositional element that can dramatically improve the visual impact of your photos.

What Are Leading Lines?

Leading lines are, in essence, visual paths drawn in an image that lead the viewer’s eye towards a particular point, often to the main subject of the photograph. They serve to guide the viewer’s attention, create depth, and add a dynamic element to a composition. Leading lines are everywhere, from the natural lines created by rivers or coastlines, to architectural lines in cityscapes, to implied lines in portraits.

Understanding and leveraging leading lines in photography can significantly enhance your images, and here are some types of leading lines you should know.

1. Straight Lines

Straight lines are probably the most common leading lines that photographers utilize. They are powerful and direct. Whether vertical, horizontal, or diagonal, they create a sense of order and stability.

  • Vertical Lines: These lines can imply strength and grandeur. Think of towering skyscrapers or a towering tree in a forest.
  • Horizontal Lines: These suggest tranquility and breadth. The horizon line in a landscape photo is a classic example.
  • Diagonal Lines: Diagonal lines add a sense of dynamism and movement to a composition. They are often used to lead the viewer’s eye from one corner of the image to another or directly to the subject.

2. Curved Lines

Curved lines, such as those found in winding roads, rivers, or architectural arches, create a sense of fluidity and grace in a composition. They can add a rhythmic, harmonious feel to your photographs and guide the viewer’s eye more subtly than straight lines. An “S” curve is a particularly pleasing type of curved line, often used in landscape and nature photography.

3. Implied Lines

These are lines that don’t physically exist but are suggested by elements within an image. They can be formed by the direction a person is looking, the path of a dancer’s leap, or even the sequential positioning of objects in a scene. Although they’re less obvious, they can be incredibly effective in guiding a viewer’s gaze towards the subject.

4. Interrupted Lines

An interrupted line is a leading line broken by another element or object in the frame. For example, a fence line may be interrupted by a gate or a tree. This type of line can create tension in an image and adds interest to the composition by breaking up the monotony of a continuous line.

5. Converging Lines

Also known as perspective lines, converging lines are common in architectural and street photography. They occur when two or more lines start from different points but meet at a single point in the image, often on the horizon. Converging lines create depth and perspective, giving a three-dimensional feel to a two-dimensional image.

Conclusion

Mastering the use of leading lines can elevate your photography to new heights. They serve not only to draw attention to your main subject but also to instill a sense of order, add depth, and enhance the overall aesthetic of your images. As you become more familiar with these various types of leading lines, you’ll begin to see them everywhere and instinctively incorporate them into your compositions.

Remember, while these guidelines can be incredibly helpful, they’re not hard and fast rules. Experiment, be creative, and don’t be afraid to break the rules once you’ve learned them. After all, photography is an art form, and you are the artist. Harness the power of leading lines and let your unique vision shine through your work.