Fixing Exposure Extremes as a Photographer.
What is “Clipping” in photography?
When the brightest tones in your photograph are pure white, and they contain no image detail at all, this means the highlights have been “clipped” off.
Conversely, when the darkest tones in your photograph are pure black, and they contain no image detail at all, this means the shadows have been “clipped” off.
Clipped means that those areas of the photograph are outside of the recordable dynamic range, and they cannot be reproduced properly.

You can check for “clipping” by looking at your Histogram. In this image, we are using Lightroom as an example. This description would also apply to Photoshop and Adobe Elements as well. If you are using another editing program – one that shows the Histogram- then these tips will help you as well.
The Histogram (in Lightroom) is located in the upper right corner of the “desktop workspace”.
It typically looks something like a mountain range with peaks and valleys.
A Histogram’s purpose is to display all of the tones located within a photograph using a numerical value on a graph.
Concentrate on the two red arrows that are pointing upward at the Histogram.
The left arrow points out the shadow end of the Histogram. Take notice that the “mountain range” (aka “the graph”) drops down to the baseline before it reaches the red arrow.
This means that the shadow end is not clipped. All of the shadows that you see in the image preview window have recordable detail.
The right arrow points out the highlight end of the Histogram. Take notice that the “mountain range” (aka “the graph”) is cut off before it reaches the red arrow. It never drops down to the baseline.
This means that the highlight end is clipped off, the result being that not all of the highlights that you see in the image preview window will have recordable detail.
Now, turn your attention to the two red arrows at the top of the Histogram. At the tips of those two arrows you will see two small icons.
These icons are buttons. By hovering your cursor over them and doing a left click on your mouse, you can turn on, or off, a “clipping indicator”.
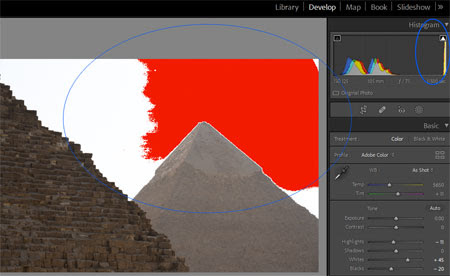
The left icon is the “shadow clipping indicator”, and the right icon is the “highlight clipping indicator”.
In the image above, the clipping indicators are turned on.
Look at the image preview window.
The shadow clipping indicator would appear as a “blue overlay” wherever the clipping occurs on the image.
We know from the Histogram that this image has no clipping in the shadow end, so we aren’t seeing any blue overlay.
The highlight clipping indicator appears as a “red overlay” wherever the clipping occurs on the image.
We know from the Histogram that this image does have clipping in the highlight end, so we are seeing a red overlay in those areas. (The far left red arrows are pointing at the areas of clipping.)
Now that we have identified the clipping, and where it is located, we can attempt to fix it.